Take a guess..
May 6, 2012

What did we spend our Sunday afternoon doing?
Where does your toothpaste come from?
April 24, 2012
Homemade scrubbing power!
I am about to admit something rather embarrassing. A few weeks ago I went to the dentist for the first time in over four years awhile. I was terrified of cavities galore, chastisement from my hygenist and other scary things associated with regular dentist appointments. Instead, I was congratulated, my dentist remarked that I have wonderful teeth and said I must take great care of them. What do I thank? Homemade toothpaste, from a handful of simple pantry items.
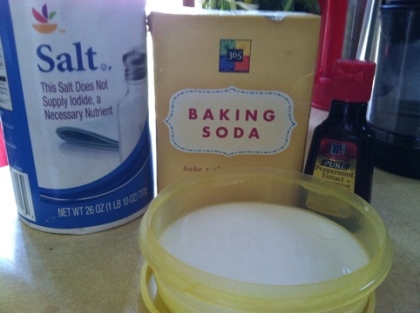
Last summer I began on an adventure of eliminating toxics from my life in every place possible. Not only is it important to watch what goes into my body as nutrients, but what I use to clean my house and myself. As the flax seed hair gel already posted about, this toothpaste is a simple way we not only take control of what goes into our bodies, but we take control of who gets our dollars. Not to mention, based on the ingredients pictured above we have clearly taken a side on the fluoride debate.
We’ve been using homemade for almost a year, and whenever I use commercial toothpaste my taste buds are shocked at how sweet it is. Once I did some poking around I found out the sweetness comes from saccharin, an artificial sweetener which is petroleum based and, it has been argued since the 1970’s, a carcinogen. Making your own will allow you to choose where your dollars go (even Tom’s Of Maine, the forever heralded natural brand, is now owned by Colgate-Palmolive), what ingredients you do or do not put into your body, and- it costs pennies to make!

Making toothpaste by the moonlight..
The recipe we use comes from another recipe from Diy Natural (have I mentioned that I love their website?).
Homemade Toothpaste:
You’ll need:
-container for mixing
– approximately 2/3 c. baking soda
-1.5 T salt
– water
-any extracts you may want to add
Step 1: Choose your container. We have found that anything shallow works well, but you’ll need a bit of a lip to be able to stir things up a bit when water separates from the baking soda from time to time. I had the yellow and white containers lying around that are pictured above, and they work well. You want to make sure it will seal OK, as it is going to be hanging out in your bathroom. The width isn’t super important, as long as you can get your toothbrush head in there. We just happen to have really wide containers.
Step 2: Add baking soda to half-way fill your container. For us this is a little shy of 2/3 of a cup. This stuff won’t go bad, so if you’ve only got a hefty container-no worries. We go through 2/3 c. between the two of us in about 3-5 weeks, for reference. Once you get in the habit it takes a minute to whip up, and fresher is always better.
Step 3: Slowly add water, stirring as you do. You’ll need about 3/4 as much water as you did baking soda. You want it to be pasty, not liquid. It might dry out eventually, we often have to add more water once or twice, but for starters try to get a thick paste.
Step 4: Add salt to your liking. I think the salt gives more scrubbing power and really makes my teeth feel clean. We add 1.5 T of salt to ours (about 5.5 teaspoons!). If you’re cautious about the salt, start adding 2-3 teaspoons and, after your first brush, adjust the ratio if you want more or less.
Step 5: We add a touch of peppermint extract when we’re feeling extravagant. I think we’ve gotten used to the flavor without any extract in it, but if you’re just making the switch from commercial toothpaste you may be surprised by the taste of baking soda and salt! Try adding a little mint or other extract if you need something to cut the bitter baking soda. But be warned- a little extract goes a LONG way. Start with 1/8 of a t and adjust later (yes, 1/8!).
That’s it! We dip our brushes in and scoop some of the paste and scrub away!
Happy brushing.
Sourdough Bread 101
April 18, 2012
I’ve made quite a few loaves from my sourdough starter and I have combined a few recipes, tweaked oven and rising times and think I’ve got it pretty down pat. Here’s a step by step recipe for making your own sourdough loaf!

The finished loaf!
There is one important thing to note about this recipe (or, really, any sourdough recipe)- the amount of waiting time there is. Don’t let the time intervals scare you! The active time in this recipe is incredibly short, and if you have a morning or an evening to spend at home, it isn’t so bad to do it surrounded by growing yeasts and the smell of baking bread.
You will need about 5 minutes to mix up the sponge which needs to sit for about 8 hours (see instructions below). Then you’ll need a period of about three hours where you’ll be around, but not actively working with your dough the whole time. I suggest either putting the sponge together after dinner and baking in the morning or, putting the sponge together in the morning before leaving for class/work and baking in the evening. Play around with it, make it work for you! If the sponge sits for 10 hours, it won’t kill it. And if the dough rises for 2.5 hours while you’re grocery shopping, it won’t kill it.
And a final note- ff you read the ingredients below, you will realize that there are essentially four important aspects to this bread. Flour, water, salt and oil. You can add some fancy mix-ins but really, using high quality flour is the best way to guarantee you’ll have a stellar loaf. I use about 50/50 whole wheat and white flour to begin with, then any additional flour I need to add while kneading is whole wheat, upping the ratio a bit. I use locally grown and milled whole wheat flour that costs about $2.25/lb and King Arthur white, unbleached flour that costs about $1.60/lb. Because these are really the only things that cost much going into the recipe, I’ve realized it costs me about $4-5 per loaf to make this recipe, which I feel totally comfortable with but others may not. No matter what you use, I applaud your efforts to make delicious, simple food for you and yours!

The delicious locally grown and milled flour I'm fortunate to have access to!
Whole Wheat Sourdough Bread (makes 1 loaf)
(based on the recipe for sourdough loaf in The Tassajara Bread Book)
Ingredients:
-1/2 cup sourdough starter
-2-4 cups whole wheat flour
-2-3 cups white, unbleached flour
-2 cups warm water
-1/4 c neutral oil
-1/2 T salt
-optional add ins, 1 cup sunflower seeds, 2 T sesame seeds, 1/2 c raisins, 1/2 c chopped dates, 1/4 c ground flax seed etc.
Other necessities:
-large, plastic or ceramic mixing bowl, I’ve read that metal will interact badly with the yeast
-wooden or plastic spoon (again, avoid metal)
-cheesecloth or other covering for your bowl
-baking sheet
Please let me know how yours turns out if you follow my recipe. Or, if you have a recipe you love- leave a comment and let me know, I always learn so much from trying out new recipes!
Happy kneading.
English Muffins for Easter
April 16, 2012
 Our Easter celebration last weekend consisted of brunch at M’s grandmother’s with his family. The spread included delicious asparagus, bagels with cream cheese (even a vegan cream cheese!), a fresh salad and lots of fruit options. We opted to bring some homemade english muffins, a baking adventure which I had never embarked on. Obsessed with my new sourdough starter I was determined to find a recipe that would only rely on sourdough to get the muffins rising, and I found rave reviews about the recipe over on The Fresh Loaf. And let me tell you- this recipe was per-fect. Don’t make them alone, you won’t be able to resist feeding someone cute a warm, crisp english muffin right off the pan!

I made a batch and a half and cut out the muffins using the screw lid of a mason jar. We made our muffins purposefully small, knowing we’d be adding them to a buffet of goodies, and we ended up with about 2 dozen 2″-diameter beauties. You can see them rising in the picture above. It was a pretty quick recipe to whip up, really only relying on the starter to give them a boost. They didn’t rise all that much during their time on the table, but once they were in the pan they popped right up with a delightful springy-ness.

The english muffins in the hot skillet, fresh from their rising

3-4 minutes later they have popped right up, and are flipped to brown on the other side.
I followed the recipe exactly, substituting almond milk for the dairy and setting the disks to rise on semolina flour. I also used about 3/4 whole wheat flour and 1/4 white flour which made them very hearty but, fortunately, didn’t impact their ability to rise at all. We found them to have perfect nooks and crannies excellent for holding jam or other toppings.
I whipped up a quick jam using local peaches canned last summer, some frozen strawberries picked last summer, orange zest and about a tablespoon of honey. They went over well with friends and family alike, and also helped to slow my ever-growing starter. Now I’m convinced we can use sourdough to make any yeasted recipe! Ours imparts a very, very slight tang, which makes it wonderfully versatile. I’m looking forward to sourdough pizza crust, bagels and cinnamon rolls, once this semester finally ends!
Happy rising!
Flax Seeds Two Ways
April 9, 2012
What do vegetable fritters and hair gel have in common? In our house- flax seeds!

We received a delicious box from Valley Green Feast on Friday full of beautiful produce, some locally milled and grown flour and Massachusetts cranberries. We’ve reached a tough point in the year for local foodies, spring hasn’t quite sprung and winter storage crops are running low. However, our box was full of some regional items, including a few summer squashes and some parsley. I had heard of squash fritters but never made them myself, convinced they needed to be half vegetable half egg in order to successfully bind together. A post over at My Garden Grows changed my mind with the brilliant use of ground flax seeds as the binding agent.
We used VGF parsley, squash and flour, and frozen peppers and corn from last summer. The fritters were fried up in coconut oil and were incredibly fresh and crisp tasting, making me look forward to spring and summer crops rolling in!

Any vegan baker worth her salt knows the unbelievable gelling capabilities of those innocent little flax seeds. Not only do they work to bind fritters, they make a delicious addition to any dessert in need of an egg that won’t suffer from their slightly nutty, health-food taste. And, amazingly, flax seed gel makes a fantastic hair gel. I have been transitioning from using store-bought personal and cleaning supplies since last summer and have thus far ticked shampoo, conditioner, deodorant and toothpaste off my list. Laundry detergent and hand soap are up next.
Until recently, however, I was using apple cider vinegar to clean my hair, but relying on a bizarre, bright blue, store-bought hair gel to keep everything in place. I ran across flax seed hair gel when reading up on Diy Natural about homemade hairspray. My hair ranges from relatively curly on a good day to moderately wavy every other day, and is known to frizz in even the slightest humidity. The homemade hairspray recipe in the DIY Natural database didn’t quite pack the staying power I need from my hair products, but a reviewer left a comment referencing flax seed hair gel. My curiosity got the best of me, and I found a multitude of recipes using everything from pantyhose to cheesecloth, tea balls and sieves to separate the flax seeds from their gel.

I’ve made this gel a few times now, following different instructions each time trying to determine which would work best for me. Here’s my current method, although I’m sure it will change slightly each time I make it. Let me know if you find a simpler or more effective way to make this product!
Homemade Flax Seed Hair Gel
You Will Need:
-1/4 c. flax seeds
-1.5 cups water
-small jar to hold gel
-fine mesh sieve
-bowl your sieve can sit in without touching the bottom (see set up above)
-small sauce pan to boil water in
Happy hair and happy spring.
